Section I – Non-Fatal Strangulation
Strangulation Assessment, Documentation, and Evidence Collection Guidelines
Equipment Needed

- Camera
- Measuring tape
- Evidence collection kit (swabs, sterile saline or water, envelopes, paper bags, evidence tape, etc.)
- ABFO No. 2 ruler
- Speculum
- Mannequin or Styrofoam head (optional)
- Gloves
Definition
Strangulation is a form of asphyxia produced by a constant application of pressure to the neck. The three forms of strangulation are: hanging, ligature, and manual. Hanging occurs when a person is suspended with a ligature around his or her neck, which constricts due to the gravitational pull of the person’s own body weight. Ligature strangulation occurs when the pressure applied around the neck is with a ligature only. Manual strangulation occurs when pressure is applied to the neck with hands, arms, or legs. (Ernoehazy, 2016; Funk & Schuppel, 2003; Line, Stanley, & Choi, 1985; Taliaferro, Hawley, McClane, & Strack, 2009; Wilbur et al., 2001).
Anatomy/Pathophysiology
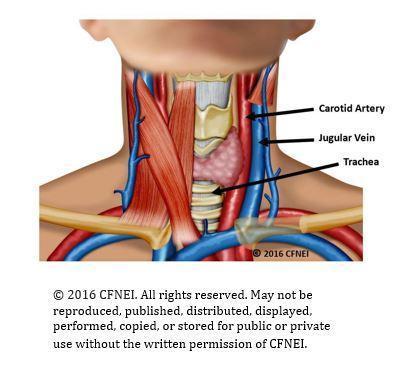 Pressure around the neck can result in the closure of blood vessels and/or air passages. Injury and death from strangulation occur from one or more mechanisms. The first mechanism is venous obstruction, whereby occlusion of the jugular veins results in congestion of the blood vessels and increased venous and intracranial pressure. The second mechanism is carotid artery obstruction, which stops blood flow and impedes oxygen delivery to the brain. The third mechanism is pressure on the carotid sinus that can cause acute bradycardia and/or cardiac arrest. Strangulation can result in injuries to the soft tissues of the neck, esophagus, larynx, trachea, cervical spine, and the laryngeal and facial nerves. (Hawley, McClane, & Strack, 2001; Shields, Corey, Weakley-Jones, & Stewart, 2010; Smith, Mills, & Taliaferro, 2001; Taliaferro, Hawley, McClane, & Strack, 2009).
History/Patient Description of the Strangulation Event
Describe what happened, using the patient’s own words. Place quotation marks around the patient’s comments. Also, describe the patient’s appearance, behavior, speech, eye contact, and affect/demeanor using terms such as “slumped,” “weeping,” “averting eye contact,” “stammering,” “somber,” “agitated,” etc. Include the assailant’s name, date of birth, and his or her relationship to the patient. Attach additional pages, if needed. Below are specific questions to ask each patient who reports strangulation. (As needed, reword questions to the appropriate developmental level of the patient.)
- Describe and demonstrate on the head model how you were strangled. One hand? Two hands? Arm? Leg? Other object(s)?
- How many times were you strangled?/Over what period of time?
- Were you shaken while you were being strangled?
- Was your head pounded on the ground or wall while you were being strangled?
- Did your feet leave the ground while you were being strangled?
- How long did the strangulation(s) last?
- On a scale of 0–10, how much pressure was applied to your neck during the strangulation(s)?
- What did you think was going to happen?
- What did the assailant say to you before, during, and after you were strangled?
- What made the person stop strangling you?
- Were you suffocated (defined as smothered)? (Suffocation refers to obstruction of the airway at the nose or mouth.)
- Did you have any difficulty breathing or an inability to breathe?
- Did you or do you currently have a cough?
- Did you or do you currently have trouble swallowing?
- Did you have a hoarse, raspy, or complete loss of voice?
- Did you or do you currently have any changes in your vision? (seeing spots, tunnel vision, blurry vision, everything went black, etc.)
- Did you or do you currently have any changes in your hearing? (roaring, ringing, etc.)
- Did you become dizzy or lightheaded?
- Did you lose consciousness? (passed out, blacked out, etc.)
- Did you experience any mental status changes? (restlessness, combativeness, amnesia, psychosis, etc.)
- Did you vomit as a result of being strangled?
- Did you lose control of urine or stool while you were being strangled?
- Were you sexually assaulted?
- Were you slapped, punched, kicked, or bitten anywhere on your body?
- Have you been strangled prior to this event?/How many times?
- Did you or do you have a headache?
- Did you bite your tongue or the inside of your mouth?
- If pregnant, are you having any abdominal cramping, vaginal discharge, or bleeding?
- Were you sexually assaulted during the event?
Documentation of Physical Findings/Description of Injuries

Examine the head, face, neck, and chest completely, using 360 degrees. Closely examine the sclera, conjunctiva, lips, oral cavity, palate, ears, and scalp. Observe for areas of erythema, abrasion, contusion, swelling, laceration, incised wound(s), fracture, bite mark(s), burn(s), or tenderness. Record each injury, including patient statements about the injury (e.g. “he grabbed my neck; that wasn’t there before he did that”) by drawing a diagram. Label each injury drawn on the diagram by using the consecutive alphabetical or numerical systems (A, B, C or 1, 2, 3, etc.) to describe each injury separately. Attach additional pages if needed. Document the location, shape, color, and size of all injuries, using centimeters as the unit of measure. Note length, width, and depth for each injury (if possible). Also, measure the neck with a measuring tape to establish a baseline for follow-up measurements (to determine whether neck swelling is present). Include the following in the patient’s assessment:
- Voice changes: Dysphonia (defined as hoarseness) or aphonia (defined as severe or complete loss of voice)
- Swallowing changes and tongue swelling: Dysphagia (defined as difficulty swallowing) or odynophagia (defined as painful swallowing)
- Breathing changes: Dyspnea (defined as difficulty breathing)
- Visible injuries on the neck and mastoid: Ligature marks/edema/abrasions (scratches and scrapes)/erythema/contusions
- Petechiae: Eyelids/peri-orbital region/face/scalp/neck/ears/soft palate/under tongue
- Subconjunctival/Scleral hemorrhage/Scleral edema (eyes)
- Neurological findings: Ptosis/facial droop/unilateral weakness/loss of sensation/paralysis/seizure
- Neck swelling: Measurement (in centimeters) for size (mark neck with a Sharpie pen for accurate follow-up measurement)
- Miscarriage/Pregnancy – FHT/LMP
- Lung injuries: Aspiration pneumonia/pulmonary edema
- Other symptoms: Acid reflux, etc.
- Pain, swelling, erythema, contusion, abrasion, petechiae, bite marks, knife wounds, or gunshot wounds on any other area of the body (i.e., chest, back, upper extremities, lower extremities)
Photographs
Use your facility/community protocol. If no protocol is available, use the guidelines listed below.
- Take full-body distant and mid-distance photographs. Take multiple photographs of the front, sides, and back of the face, neck, upper chest, and shoulders.
- Carefully assess and photograph the eyes and mouth. Take multiple photographs of both eyes of the patient looking up, down, to the left, to the right, and straight ahead. To visualize and photograph the conjunctival sac, gently pull down on the lower lid with a gloved hand. If no ocular trauma is present and if the patient is able to tolerate, flip the upper eyelids up on each eye to visualize and photograph.
- With the patient’s mouth open, depress the tongue with appropriate assistive devices to light the internal structures. Take photographs of the upper and lower lips, frenula, under the tongue, the soft palate, uvula, and oropharynx. To completely visualize and photograph the oral structures, rotate the camera so the flash is in various positions, including the upright position, left, right, and upside down.
- Perform a complete head-to-toe assessment of the patient, and photograph and document all injuries. Take close-up photographs of all injuries with and without a measurement ruler in place. Ensure that the plane of the object being photographed is at 90 degrees.
- (Optional) Photograph the patient’s demonstration on the strangulation model of how he or she was strangled.
- Take follow-up photographs of all visible injuries within 72 hours post-assault (based upon patient needs, availability, etc.).
Collection of Evidence
Use your facility/community protocol. Consult your local forensic laboratory for recommendations. If no protocol is available, use the guidelines listed below.
- Collect dried and moist secretions (i.e., blood stains, saliva, etc.) from the face, head, neck, and mouth. Use two or four (as indicated by protocol/recommendation) sterile cotton swabs for each specimen. Swab moist secretions with dry swabs. Swab dry secretions with swabs moistened with sterile saline or sterile water. Air dry the swabs before packaging in an envelope or a swab box.
- Make control swabs by moistening swabs with the sterile saline or sterile water used (as indicated by protocol/recommendation). If collecting control swabs, label, air dry, and package separately from the evidence samples.
- Collect fingernail swabs, if indicated per history. Place swabs from each hand into a separate, labeled envelope.
- Label each envelope or swab box with the contents, patient name, collector name, the date, and time of collection. Seal the envelope with tape, and then initial. Document location and the potential biological specimen identified.